MiniLab 1.0
Manual
- Introduction
MiniLab is a customizable remote user interface to other target machine including Arduino. Just drag and drop prefabricated parts to build a user interface without programming, and you can concentrate efforts on programming the machine. Unity is required to be installed since an user interface is constructed and runs in Unity Editor.
Features are:
- Various UI parts to receive and send texts, integers and floats
- Unity Console window also to receive texts, useful especially for debugging
- 5 kinds of sounds ringing by requests received
- Library for easy target programming
- Just a click on the menu to generate target codes for the UI you built
- Communication through serial ports(COM) (Later versions will add other ways like TCP/IP)
Unity is used generally to build an application after editting and running in it, but MiniLab is not a set of parts to build applications, and it runs only in Unity Editor.
- Installation
Windows and Unity are supposed to be installed already.
Extract minilab10.zip into a folder. There, the MiniLab folder is a library for Arduino. Copy it into your Arduino IDE's "libraries" folder. Several examples of Arduino program which can be uploaded to your Arduino board are in the arduino folder. They were tested on Arduino Uno board.
The extracted folder also has manual.htm(this manual), related files and an Unity asset package. Open Unity projects and import the latter by the Assets->Import Package->Custom Package menu. All the example scenes in it were tested in Unity 5.3.4f1 Personal.
Let's call the extracted folder the Product folder. It should be maintained since MiniLab in Unity will access it for a license as well as the manual and examples.
There are restrictions as described in the following sections. To remove them, get and install the "sys-license" key for your system, as described in the Licensing section.
- Getting Started
In the Unity Editor, open the scene "Hello" located in Assets/MiniLab/Examples. Then the Game View shows an example of UI which has just a button only. Every example UI is for the corresponding Arduino program named the same, in the Product folder said in the previous section.

The Hierarchy window shows the logical structure of UI. The MiniLab's Inspector (the Inspector window contents when the GameObject "MiniLab" selected in the Hierarchy window) shows Port Name, Baud Rate and Color. Type "COM5" into Port Name if your Arduino board is connected at COM5 for example. Changing Color is guided in the last part of the Examples section. Use your Arduino IDE to open, compile and upload Hello to the board.
Now, let's press the Play button to run the scene. Push the "Push" button in the Game View several times. Then, each time, the text and the color on the button changes, and LED on the board turnes on or off.
Without a license, you can see a warning message in magenta background at the bottom of the Game View (The exact meaning is stated in the Licensing section). Error messages also can be seen there, with blue background, as well as in the Console window, and then you press the Play button twice (to stop, and to Play again after curing the error).
There are 6 pieces of information or menus in the MiniLab/Info's inspector. Product Folder is the path to the folder said in the Installation section. Please insert the path into it (You can copy it from the dialog box issued by the right-mouse-button menu on any file in the folder). Then menus for manual and Arduino examples folder can open them. Your web browser will go to the MiniLab site (http://minilab.cafe24.com) by the menu Go Product Site. The other two items will be described in the Licensing section.
Filling the Product folder path as above for each scene may be tedious. Try to fill in the Empty scene and save, or fill in the MiniLab prefab. They are introduced in the next section as the starting places to construct a UI.
- How They Works
Under MiniLab/Bench in the Hierarchy window. we build a UI, that is, we create and assemble parts called "Controls", by dragging the corresponding prefabs from Assets/Resources/MiniLab/Controls and drop there. The only one Control in Hello is a button: the UI is made by dragging the "push" prefab into Bench and we can modify its properties like the text "Push" on the button in the Inspector.

There is a prefab "MiniLab" in Assets/Resources/MiniLab, which has nothing under Bench, so as to act as an empty UI (nothing in the Game View). We can make a new UI starting with an empty UI, by opening a new scene and drag the prefab into the Hierarchy window. Remove Main Camera in a new scene since the prefab already has one (invisible in Hierarchy). Instead of these steps, you can start with the "Empty" scene prepared in Assets/MiniLab. You are recommended to make a new folder somewhere in Assets, to save your scenes.
The button in Hello is named "push" in the Hierarchy window. It was created by drag-and-drop of the prefab named the same. If renamed "push1" after created, its corresponding object in Hello.ino is recommended to be push1. But, if we Play again after renaming in the scene now, without changing the Arduino codes, the scene still works! Why? It is not the name but "id" an integer, that is sent to or from Arduino in order to identify a Control. Note that the object "push" of the class "Push" is allocated with 1 as the id, the argument of the class's constructor, in Hello.ino.
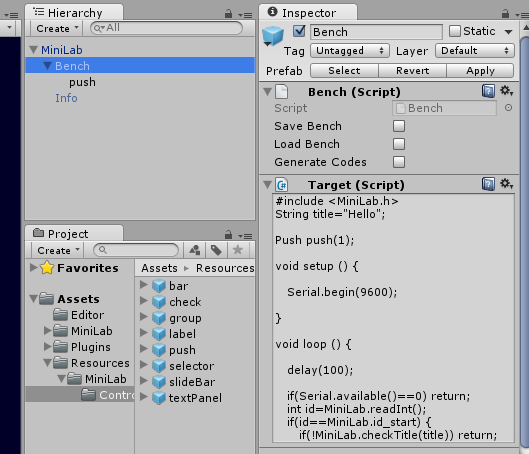
After building UI with many Controls in it, you don't have to manually write codes to allocate the corresponding objects. Clicking the "Generate Codes" menu in the Bench Inspector shown above will generate codes into the Target Component. Not only the allocation statements but also the whole general frame is generated, for you to copy into the Arduino IDE and modify.
In the generated codes, the objects have hierarchical names. That is, if "push" is a child of other Control, the object name will be "parent_push" if the Control is named "parent" and is a child of Bench.
Note that the allocation statement will not be generated unless the Target Component is added to the Control's Inspector. There are some Control prefabs without Target, since they are just for visuals in the scene and ignored in Arduino in many cases. If you need, drag Assets/Plugins/MiniLab/Target and drop into the Inspector. On the contrary, sometimes you want to omit a Control in Arduino codes, even though its prefab has Target. Just remove it from the Inspector after the prefab dropped into the scene.
Addionally the menu also fills "Path" in the Control's Inspector. It is the very hierarchical name, which you may refer to or copy into the Arduino IDE to write a function call to the object or to write its id . Furthermore, the Target Component of the Inspector is filled with function calls, to help you more refer or copy in IDE.
Note that we use names or terminology interchangeably, but the meaning should be clear contextually. When we say "Push", it can mean the Push Component, a GameObject it is attached to, the prefab which can be instantiated into a scene to be such a GameObject, the Arduino C++ object corresponding to it, or the class for the object, although their names may be not Push but push or renamed. Furtheremore, Control can mean a kind or class derived from Control, like Push for example, or its instance.
MiniLab and Arduino works by sending messages to each other. The head of a message indicates generally which Control it is about. The next section "Examples" have tutorials, beginning with Hello. Just several simple examples there cover almost all features of MiniLab. Sections "Target Programming" and "Controls" are reference manuals.
Refer to the section "Miscellaneous", for other menus and Assets not described here.
- Examples
Examples are made to demonstrate that the UI is interacting with Arduino through communication, without making you do any soldering or connecting. Just a board will do. So, "current" in a example is not measured but fictitious, since you want to know the UI for displaying and you will copy and modify the example into your project really measuring currents or something. But the built-in LED is used in some examples, to make you not bored.
- Hello
Hello changes the pin 13 state and displays it by texts and colors on the button as well as turning on and off the built-in LED at the pin. Hello responds 2 messages, the start and the button pressing. They are the 2 id checking if-statements. The latter not only changes the state but also asks MiniLab to play a system sound and print a message on the Unity Console window, by the functions beepSound() and log().
To simplify the example, nothing but the title-checking (comparing with the scene name) is done to the start message, but there we could also initialize and display the state.
- Check_and_See
2 types of Control, Check and TextPanel are introduced. Check has a text and a check-mark square which shuttles between "checked" and "unchecked" states. When clicked, it changes and sends the state to Arduino. TextPanel is similar to Push except that it is not a button but just a display.

At the start message, the state of the Check is initialized. The TextPanel and LED reflects the state. After they are also initialized at the start, they changes according to the Check message. The message consists of id and an integer (1 means true and 0 false).
- Variable_Bar
Bar and SlideBar are introduced. While vertical and horizontal respectively in this example, the direction can be changed in the Inspector. Bar displays a float value by the legth ratio of the inner to outer rectangles, with 1 corresponding to the same lengths. It is used generally for values ranging 0 to 1. SlideBar displays 3 float values with the first two defining the start and the end of the bar, and the last value defines the handle position. When the handle moves by the user, it sends the position to Arduino.

This example initializes the 2 Controls by 4 float values and responds to the SlideBar message to change the Bar. The relation between the 2 float values is fictitious: The Bar would be a current measured changing when a voltage changes set by the SlideBar with Arduino pins connected to a circuit, in your real project.
- Number_Selector
Selector is introduced. When the user clicks on it, it shows a list. After the user selects other item in the list, it sends the 0-base index of the item. The example lets a TextPanel reflect the selection with a fictitious relation. Note that the Generate Codes menu in Bench generates also the statements declaring the items' indices as constants, below the statement allocating the Selector object.

But this example is not using the constants, just multiplying the selected index. New example or your program is expected later, where switch(index) statement responds to each constant case.
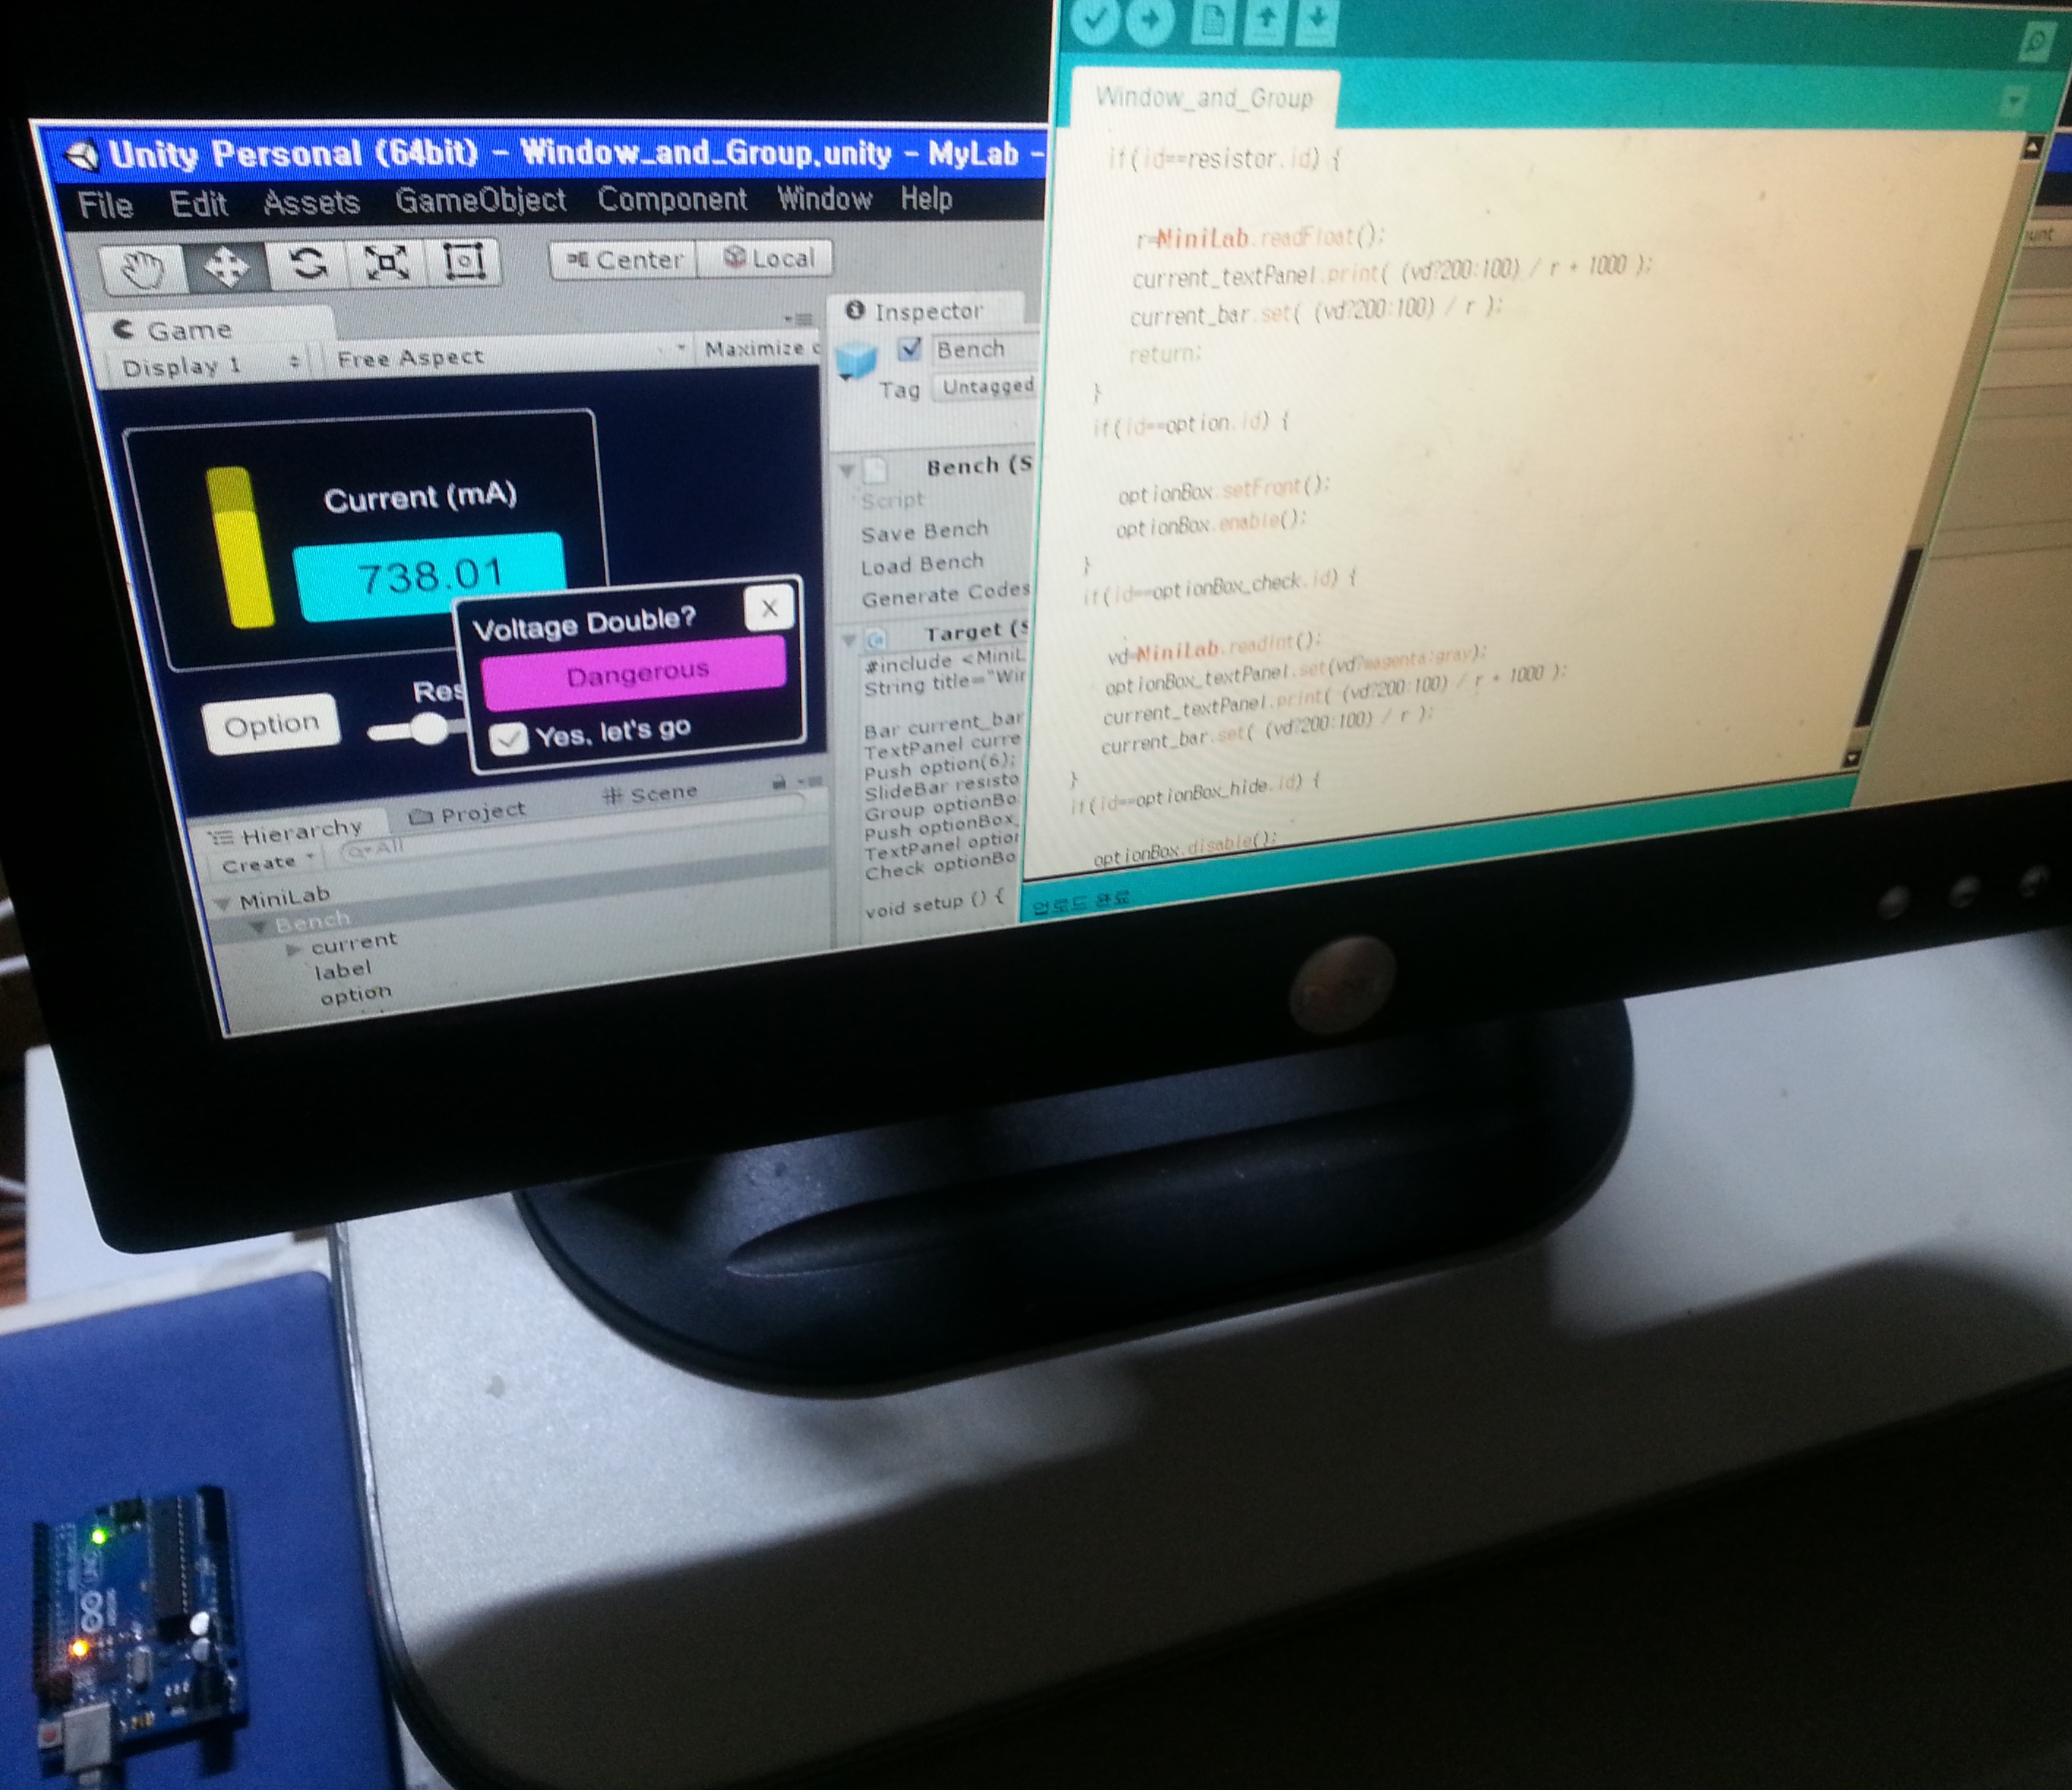
- Window_and_Group
Vary the resistance to see the current change. Click option button to show a dialog box where you can double the voltage. Generally Bar is used with a value in [0, 1], but the example does not confine and lets the current bar penetrate even the group border to express danger. Many Controls are used here, but only Group and Label are new.
Group does not receive user inputs and even does not display a value. But it is the only Control that can have a child. Its visual is a rectangle with edges as the border, and the children are generally located inside the rectangle. Therefore its role is a "window", or a "group rectangle" in a window to surround some Controls in the window. For windows we may set the border more thicker in the Inspector.
This example has a group rectangle named "current" in which 2 Controls display the electric current, but it has no parent window, since the Game View is taken as the main window. If you want the filled color of a group rectangle to be the same as the parent, in this case, you may change Color in the MiniLab Inspector when you change Color in the "current" Inspector. The example also has a window named "optionBox". It acts as a dialog box where the voltage is changed, so that the current varies displayed in the main window.

optionBox is "open" (appears) when the Push named "option" is clicked, and "closed" (disappears) when the other Push named "hide" with the text "X" is clicked. The latter Push could be omitted, if the former closed the window on the next click. It demonstrates that a window can include a close button.
enable() and disable() is called to show and hide optionBox. They are Control's functions (methods), so that not only Group but any Control has such features. We let a Control be the last sibling by setFront() and it is used in addition to enable() to guarantee showing, since Unity draws a parent GameObject, its first child, second child and so on in that order.
Label just displays a text without panel(background). Generally we set the text in the Inspector and don't send a text from Arduino although it can receive. So this example has no codes about any Label, although 3 Labels are in the scene with one of them named "title". We could use more Labels to display the minima and the maxima of the SlideBar and the Bar aroud them.
Label and Group generally are ignored by Arduino as we see no Target Component in their prefabs' Inspectors. But, in the scene, Target is added to the Group named optionBox, for the Generate Codes menu in Bench to include the corresponding object's allocation statement, so that Arduino uses functions like enable().
- Hello
- Target Programming
Here are more details about the structure of a Arduino program to work with MiniLab through a serial port.
- Messages
Messages are sent from MiniLab, each with one of the following integers as the head.
MiniLab.id_start Right after you press the Unity Play button and the serial port is open, this integer will be sent and followed by the scene name. Then Arduino should call MiniLab.checkTitle() to read and check the name, and may initialize variables in Arduino or in PC (MiniLab). MiniLab.id_end Right after the Unity Play button pressed again to stop Playing, or right after some error happens, MiniLab sends this integer and closes the serial port. [a Control].id A Control sends its "id" first to inform Arduino of what happened in the Control. This is a unique 1-base integer determined by MiniLab. The expression [a Control].id means "push.id" if the Control's name is "push". The next data sent following this depends on the kind of Control as described in the Controls section. - MiniLab Functions
The following functions reads float, int, and String values respectively, sent from PC. Actually they are sent as "\r\n-terminated Strings" and converted by the functions.
float MiniLab.readFloat (); int MiniLab.readInt (); String MiniLab.readString (); The following functions send messages to MiniLab, fot it to do special works and play 5 system sounds, respectively.
bool MiniLab.checkTitle (String title); reads the sent scene name, compares it with title, and returns the result. When the result is "false", it lets MiniLab know by sending a message, before returning. It should be called to respond to MiniLab.id_start. void MiniLab.log (String str); sends a String for MiniLab to print in the Console window. The simplest method of displaying and a useful tool for debugging. void MiniLab.beepSound (); void MiniLab.asteriskSound (); void MiniLab.exclamationSound (); void MiniLab.questionSound (); void MiniLab.handSound (); - Other Classes
Refer to the next section for Control. Here is about Color.
Color [name] (float r, float g, float b, float a); allocates a Color with each argument in [0, 1]. For example: Color myGreen(0,0.8,0, 1); // If you don't like the pre-allocated ones. myGreen.r=0.3: // Make reddish. aPushButton.set(myGreen); aTextPanel.set(Color(1,1,1, 1)); // White. red, green, blue, yellow, cyan, magenta, white, black, gray pre-allocated ones you can make use of.
- Messages
- Controls
Constructors of Control, TextControl and TextLamp are used only in the library to derive other 8 classes, and they does not appear in Arduino codes. But here they are listed as subsections, to describe member functions or variables inherited by others. In other words, see subsection A for members of class B that is inherited from class A, if B : public A.
Constructors are omitted here except in Control, since those in other classes just call it transferring the argument untouched.
The access modifier "public" is omitted, since only the public members are listed here. Non-public ones are used internally by the public ones so that you don't have to know.
Descriptions about Controls and many functions omit descriptions, since they are clear if you read the Examples section. All the functions work by sending messages to the corresponding object in MiniLab, although the function name and description say nothing about communication.
In the Inspector, we can set Control's color and text properties(text, text color, font stle, and so on). The description about them are usually omitted in the Examples section and also omitted here, since they are apparent. Note that those variables generally are "not important" data (not communicated) except text and color in TextLamps (Push and TextPanel). There are important data in Selector to set in the Inspector although not communicated.
- Control
Control (int id); the constructor with the argument as the id. int id; the unique integer to identify the Control. void enable (); enables the Control. The Control will appear in the Game View. void disable (); disables the Control. The Control will disappear in the Game View. void setFront (); lets the Control be the last sibling. void setRear (); lets the Control be the first sibling. - TextControl : public Control
void print (String str); void print (float f); void print (double d); void print (int i); lets the Control display its text after converting the argument to a string if needed. - TextLamp : public TextControl
void set (Color color); - Label : public TextControl
Refer to the example Window_and_Group.
- Push : public TextLamp
Refer to the example Hello.
- TextPanel : public TextLamp
Refer to the example Check_and_See.
- Check : public Control
void set (bool on); Refer to the example Check_and_See.
- Bar : public Control
void set (float value); Refer to the example Variable_Bar.
- SlideBar : public Control
void set (float minValue, float maxValue, float value); Refer to the example Variable_Bar.
- Selector : public Control
void set (int i0_); selects the i0_-th item. The argument name i0_ means 0-base index. Refer to the example Number_Selector.
In the Inspector, other each Control has RectTransform and Control(derived) Components. Selector has one more Component "Dropdown". There you can make the list of items. In "Options" click icons "+" or "-" to add or delete, and click or drag "=" icon to select or move the item in the list. Every item should be named without blanks since the Generate Codes menu in Bench generates it as the name of the item index's constant. The others in Dropdown is recommended not to be modified.
- Group : public Control
Refer to the example Window_and_Group.
- Control
- Licensing
There are restrictions as follows, unless a license is installed:
During every other 10 seconds, UI does not send data in response to user inputs and does not change in response to the received data, as described in the waring message appearing at the bottom of the Game View during that 10 seconds.
Here below is how to install a license. Note that you are going to purchase a "sys-license" for your system id: The id generally CHANGES when your operating system is installed again or upgraded, and then the license key WILL NOT WORK so that you should purchase new one for the new id if you need.
Click the Play button, to copy id from the MiniLab/Info Inspector. Click the button again, to stop Playing. Click the menu "Go Product Site" in the Inspector.
In the web page, paste id into the "system id" window and press the Enter key to go to the shop.
In the shop, read the warning as also said above. You can move to the PayPal site by clicking the Buy Now button.
In the PayPal page, pay the price. After finishing, you get moved to the key page.
Copy the key to create the "key file", an empty file named [key].txt in the Product folder. That is, open the folder, create an empty text file by the right-mouse-button menu and rename it (The menu creates the file named like "No Name.txt" and you just replace "No Name" by pasting the key). An example is MiniLabKey12345678.txt.
The Profuct folder can be open, by opening the Arduino Examples folder using the menu in the MiniLab/Info Inspector, and by moving to the parent folder.
Click the Play button in Unity. You will see the restrictions removed and the Info Inspector has the square "Licensed" checked. If not, check if Product Folder in the Info Inspector is filled with the correct path to the folder or check if the key file name is right.
- Miscellaneous
2 menus in Bench will be described in the next version: They help you, to save all the Controls (and their structures) under Bench to a file before upgrading MiniLab, and to load them back after upgrading.
In Assets/Plugins/MiniLab are located all the codes of MiniLab including Bench and Control classes which are attached to the prefabs as Components.
Assets/Editor/TargetEditor is a "custom editor" for the Target Components in Bench or a Control, to show a large text area. You can modify for larger or smaller.
- License Agreement
Please read Agreement.txt.